Search Results
Search results are rendered by the avt.SearchBoost.Results located in the Modules menu. To add the Search Results module:
- Click on the Modules menu.
- Then select All Categories from the Category drop down menu.
- In the Module drop down menu, select avt.SearchBoost.Results.
- Then click the Add Module button.
The template is configured in UI Settings in the Search Boost Control Panel. Note that unlike the Search Box template this type of template is less restrictive. Some templates are capable of building photo albums or product listings.
- You can open the Search Boost Control Panel by clicking on Manage > Settings on the Search Input Module. Here you will see search settings specifications for the Search Results module.
Settings
You can the access settings for search results by opening Search Boost Control Panel. You would need to click on Manage > Search Settings in the Search Results module. In the Search Boost Control Panel, click on the UI Settings tab to locate the Search Results settings.
The following settings in UI Settings affect the search results:
-
Results Page. This specifies the page that contains the SearchBoost Results module. It receives the input then retrieves the results.
- Template for Search Results. Defines the layout and color scheme of Search Results. They are used to render the search results.
-
Read Create New Templates for additional information.
-
Results per page. Determines how many results appear on each page.
-
Strip HTML from descriptions on Results Page. If this option is selected HTML is stripped from results description so only plain text is displayed. We recommend that you always select this option because the description may have terrible HTML code that could reconfigure the design.
- Maximum Description Length. This option determines how long the description is allowed. If descriptions are bigger than the value specified in this field then it is stripped down.
Templates
Search Boost comes with only one template for the results page - actually there is two, but the other one just displays Page Title instead of Module Title for each search result. We plan to extend this in the future and provide other templates out-of-the-box as well for the most common scenarios.
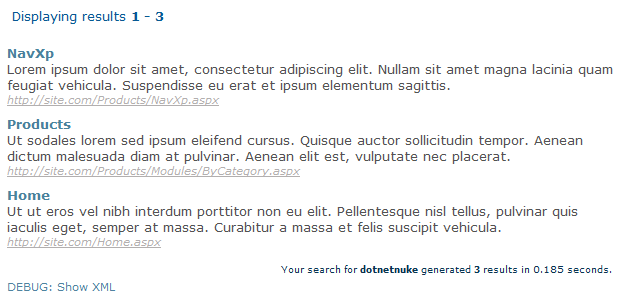
Visually, the search results are rendered like the image below. Though it is possible to customize appearance by changing the template or create new templates. This is covered in the next section.

Tokens
Search Boost can replace tokens in results. This option can be configured from the General Settings window. You can open the General Settings window in the Search Boost Control Panel.
There are 3 types of tokens you can use:
-
DNN Tokens such as User, Portal and so on
-
My Tokens if it’s installed
Starting with version 4, in order to include My Tokens in the Search Boost Results Template follow the instructions bellow.
- Open the Template.cshtml file from ~\DesktopModules\DnnSharp\SearchBoost\templates\output\default
- Add the following line after @using DnnSharp.SearchBoost.Core.Behaviors;
@using DnnSharp.Common; - Use this syntax wherever you want the token to be shown:
@TokenUtil.Tokenize("[<mytoken>]"); -
Local Tokens - these refer to each result. Valid tokens are:
- SearchItemId
- Type
- SubType
- ContainerPath
- ItemId (this is derived from SearchKey if possible, otherwise empty)
- ItemPath
- Title
- Description
- Relevance
- PortalId
- ModuleId
- AuthorId
- AuthorName
- Url
- SearchKey
- Guid
- DatePublished
- CustomXXXX - where XXXX is the the name of the custom data
The syntax for using tokens is [SourceName:TokenName] for DNN or My Tokens, and [TokenName] for local tokens.
SearchBoost New Features
- Ignore DNN Security: This will add a new checkbox under the Advanced Settings tab. If this option is ticked, in results will be listed all pages, even if the user does not have access to that page. Instead of showing the page, he will be redirected to the login page. (upcoming feature);
