Installation
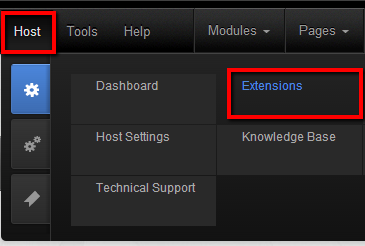
Redirect Toolkit can be installed through Extensions screen.
On successful install you’ll see the avt.Redirect Toolkit module in the module list.

You have to add a Redirect Toolkit module to the page then start configuring redirects. Each redirect can then be made global, in each case it runs for all page requests. Otherwise, the redirect runs only in the context of the page where the module has been added to.
For the module to be able to execute redirects make sure ALL ROLES & USERS that will be affected have view rights to the module (this is specified in Module Settings, by default it inherits view permissions from the DNN page). The safest way to proceed is to grant view rights to all users because Redirect Toolkit will make itself invisible for the non-administrator users. Note that this does not apply for global redirects.
Don’t worry when you grant view rights to all users, the module will hide itself when non-admin users access the page. The view permissions are only used to determine which users are affected by the redirects written in that specific Redirect Toolkit module. Further filtering of roles is possible with Role Redirects.
Requirements:
- DNN 5.2+, DotNetNuke 6, DotNetNuke 7
- SQL Server 2000/2005/2008/2012/r2 (including made and express editions)
- Asp. NET 2.0+
- IIS 6.0+
Manually adding the handlers to web.config
To handle global redirects, which are redirects that are evaluated for every request to any page or resource, Redirect Toolkit installs a special HTTP Handler. This is added automatically by DNN during installation.
But, if the installer doesn’t have access to modify web.config for example, you’ll have to add the handlers manually. To do this, open web.config in your text editor.
In web.config: / configuration / system.webServer / modules append following line:
<add name="RedirectToolkitHandler"
     type="avt.RedirectToolkit.GlobalHttpFilter, avt.RedirectToolkit.DotNetNuke"
     preCondition="managedHandler" />
In web.config: /configuration/system.web/httpModules append following line:
<add name="RedirectToolkitHandler"
     type="avt.RedirectToolkit.GlobalHttpFilter, avt.RedirectToolkit.DotNetNuke" />
If you get an error during installation, open the zip install package and modify the avt.RedirectToolkit.dnn file and remove the whole node show below:
    <component type="Config">
          <config>
            <configFile>web.config</configFile>
            <install>
              <configuration>
                <nodes>
                  <node path="//system.webServer/modules" action="update" key="name" collision="overwrite">
                    <add name="RedirectToolkitHandler" type="avt.RedirectToolkit.GlobalHttpFilter, avt.RedirectToolkit.DotNetNuke" preCondition="managedHandler" />
                  </node>
                  <node path="//system.web/httpModules" action="update" key="name" collision="overwrite">
                    <add name="RedirectToolkitHandler" type="avt.RedirectToolkit.GlobalHttpFilter, avt.RedirectToolkit.DotNetNuke" />
                  </node>
                </nodes>
              </configuration>
            </install>
            <uninstall>
              <configuration>
                <nodes>
                  <node path="//system.webServer/modules/add[@name='RedirectToolkitHandler']" action="remove" />
                  <node path="//system.web/httpModules/add[@name='RedirectToolkitHandler']" action="remove" />
                </nodes>
              </configuration>
            </uninstall>
          </config>
        </component>
After you remove these lines, add the file back to the zip and reinstall.
Locked Out?
Sometimes you might find yourself locked out of the website because of a Redirect Toolkit error. This happens because Redirect Toolkit installs an HTTP module to handle all requests for global redirects. Global redirects are rules that get evaluated for every HTTP request, regardless of the page where the module lives.
To gain access back to the site, disable the HTTP module from web.config. To do this, open web.config in a text editor and remove this line:
<add name="RedirectToolkitHandler" type="avt.RedirectToolkit.GlobalHttpFilter, avt.RedirectToolkit" preCondition="managedHandler" />
Uninstall
Redirect Toolkit can be uninstalled directly from DNN Extensions screen (or Module Definitions for older versions) just as any other module.
For DNN 4 Only
One thing to notice starting with version 2.0 is that Redirect Toolkit installs a global handler in web.config to handle global redirects. This is automatically removed from web.config on uninstall, but only on DNN 5+. On older DNN 4 you need to manually remove the following entries from web.config:
In web.config: / configuration / system.webServer / modules remove following line:
<add name="RedirectToolkitHandler"
     type="avt.RedirectToolkit.GlobalHttpFilter, avt.RedirectToolkit.DotNetNuke"
     preCondition="managedHandler" />
In web.config: /configuration/system.web/httpModules remove following line:
<add name="RedirectToolkitHandler"
     type="avt.RedirectToolkit.GlobalHttpFilter, avt.RedirectToolkit.DotNetNuke" />
Video Tutorials
Debugging
When submitting debugging information to us for investigation, please make sure to provide the following:
-
Steps to reproduce, if possible.
Admin access to your site to reproduce the issue ourselves would be even better -
If an error occurs, go to Admin > Event Viewer and locate the error message along with the Stack Trace; for the error to be relevant, the Stack Trace must contain the word RedirectToolkit
-
DNN version and Redirect Toolkit version
-
Export the following SQL Tables for us to review.
Usually you can just open tables in view mode, select all and copy in clipboard, then paste to excel- avtRedirectToolkit_Rules
- avtRedirectToolkit_Conditions
- avtRedirectToolkit_RuleActions
- avtRedirectToolkit_Settings
- avtRedirectToolkit_Log
- ModuleSettings
Extending Redirect Toolkit
In version 1.8.0 we completely rewritten the core architecture to decouple entities from actual implementation. This means that Redirect Toolkit dynamically (at runtime) determines which Condition Types, Operators and Actions to present. There are specified in configuration files located in /DesktopModules/RedirectToolkit/Config folder. But this also mean it’s possible to extend Redirect Toolkit with new Condition Types, Operators and Actions just by implementing an interface and updating the configuration.
Creating new Condition Types
A condition type is a Redirect By… category you see in Add/Edit Rule screen. A condition exposes one ore more properties. It implements ICondition interface that lives in avt.RedirectToolkit.Conditions namespace. You’ll have to link add avt.RedirectToolkit.dll as a reference to your project. You can find this assembly in the installation package or in your Website /bin folder.
Below is how we implemented Redirects By Host (in C#). Note that SimpleProperty is an utility class that you can also use in your plugins. It takes care of instantiating appropriate operator and check saved value against the one providing to the constructor.
     public class RedirectByHost: ICondition
        {
            public bool IsMatch(RedirectConditionInfo condition)
            {
                if (HttpContext.Current == null)
                return false;

                switch (condition.PropertyName.ToLower()) {
                    case "domain":
                        return new SimpleProperty(condition,
                            condition.Definition.Title,
                            HttpContext.Current.Request.Url.Host).IsMatch();
                    case "fullurl":
                        return new SimpleProperty(condition,
                            condition.Definition.Title,
                            HttpContext.Current.Request.Url.ToString()).IsMatch();
            }
            return false;
        }

        public string ToString(RedirectConditionInfo condition)
        {
            if (HttpContext.Current == null)
                return "";

            switch (condition.PropertyName.ToLower()) {
                case "domain":
                    return new SimpleProperty(condition,
                        condition.Definition.Title,
                        HttpContext.Current.Request.Url.Host).ToString();
                case "fullurl":
                    return new SimpleProperty(condition,
                        condition.Definition.Title,
                        HttpContext.Current.Request.Url.ToString()).ToString();
            }
            return "";
        }

        public List GetItems(ConditionDef condition)
        {
            return null; // no list of possible values
        }
    }
To test your plugin you have to copy it to your website bin folder and then register into to the Redirect Toolkit configuration file. So go to /Config/Conditions and create a new XML file (better to copy paste an existing file and start from there). Note that the numbers at the beginning of the XML files are only used for sorting - they determine the order they follow when listed in Add/Edit Rule screen.
Most important thing is to think of a code that is unique and short (maximum 10 chars). This is used to link a rule to a definition. After this is done proceed to defining the definitions. Obviously this should be matched with something you implemented in the code to handle them differently. In the example above, there are two properties: domain and fullurl. In the configuration file there are two important things to set: the type (use standard format FullQualifiedTypeName, Assembly Name) and the name of an operators group to use. In our case both properties are of type text so we use __opText.
More about operators in next section.
Creating New Operators
Redirect Toolkit comes with operators to handle all common scenarios, but at some points you may need to write your own. To create an operator you must write a class that implements IOperator which lives in avt.RedirectToolkit.Operators namespace. You’ll have to link add avt.RedirectToolkit.dll as a reference to your project.
Below is how we implemented the Equals operator.
    public class Equals : IOperator
        {
          public bool IsMatch(OperatorDef opDef, object savedValue, object contextValue)
         {
            try { savedValue = savedValue.ToString(); } catch { savedValue = ""; }
            try { contextValue = contextValue.ToString(); } catch { contextValue = ""; }

            if (opDef.HasFlag("ignorecase")) {
                savedValue = savedValue.ToString().ToLower();
                contextValue = contextValue.ToString().ToLower();
            }

            bool isMatch = savedValue.ToString() == contextValue.ToString();
            if (opDef.HasFlag("not")) {
                isMatch = !isMatch;
            }

            return isMatch;
        }

        public string GetName(OperatorDef opDef)
        {
            string name = opDef.HasFlag("not") ? "notEquals" : "equals";
            if (opDef.HasFlag("ignorecase")) {
                name += "IgnoreCase";
            }
            return name;
        }
    }
To test your plugin you have to copy it to your website bin folder and then register into to the Redirect Toolkit configuration file. So go to /Config/Operators and create a new XML file (better to copy paste an existing file and start from there). Note that the numbers at the beginning of the XML files are only used for sorting - they determine the order they follow when listed in Add/Edit Rule screen.
Note that the most important thing in the xml file is adding the operator to appropriate operator groups which are defined in Types.xml in same folder. Because it’s the operators group name you use when declaring which operators a Condition Types supports. An operator can be added to multiple operator groups (in our example, equals can compare both strings and numbers - and complex objects too if they implement ToString in a unique manner).
Creating new Actions
Probably this is the aspect you’ll think most about extending. The additional actions are pieces of functionality to run when a redirect matches and before actually redirecting the user. For example Log Redirect, Add/Remove roles, logout user - they’re all actions.
To create an operator you must write a class that implements IExecutableAction which lives in avt.RedirectToolkit.Action namespace. You’ll have to link add avt.RedirectToolkit.dll as a reference to your project.
Below is how we implemented the DnnLogout action.
     public class DnnLogout : IExecutableAction
        {
            public void Execute(RedirectRuleInfo rule,
                ActionDefinition actDef, string actionData, string redirectToUrl)
            {
                UserInfo cUser = UserController.GetCurrentUserInfo();
                if (cUser != null && cUser.UserID > 0) {
                    DataCache.ClearUserCache(
                        PortalController.GetCurrentPortalSettings().PortalId,
                         HttpContext.Current.User.Identity.Name);

                    PortalSecurity objPortalSecurity = new PortalSecurity();
                objPortalSecurity.SignOut();
            }
        }

        public string ToString(RedirectRuleInfo rule,
            ActionDefinition actDef, string actionData)
        {
            return actDef.Title;
        }
    }
To test your plugin you have to copy it to your website bin folder and then register into to the Redirect Toolkit configuration file. So go to /Config/Actions and create a new XML file (better to copy paste an existing file and start from there). Note that the numbers at the beginning of the XML files are only used for sorting - they determine the order they follow when listed in Add/Edit Rule screen.
It’s important that in the configuration file you specify a code that is unique and has up to 10 characters. Under execute node put the type of your action in standard format “FullQualifiedTypeName, Assembly Name”. Also note the settings-html node. This makes it possible to provide your own ascx control that will be used in Add/Edit Role screen to gather runtime configuration for your action. The ascx control must implement IActionSettingsCtrl that has methods LoadSettings and SaveSettings. They both operate with a string value which is serialization of the data (you decide the format character delimitation, xml, json, etc).