Import / Export Settings
The Action Form settings are saved in the database so you have the ability to manual change them. You can find these settings following this path: \Your-Database\Tables\dbo.avtActionForm_FormSettings. After you make some changes, you will need to Clear Cache before these changes are visible on the front-end. Note that we are using the default export/import option in DNN 8.0.4 version.
Save / Export Settings
If you have a big form that has various fields, radio buttons, drop-downs, date pickers etc. and wondering which is the best strategy to save these settings and the content to an external file that can be loaded at a later time or to another website, this is the way:
1) Move your mouse over the Module Settings button and then click on Export Content. Note that you have to be on Edit Mode to see all of these settings. A pop-up window will open. This option can also be used as a backup tool.

2) Select the Root folder where the .XML file with your settings/content will be saved. You can also change the File Name if you have more forms to backup; in this way backups can be differentiated.

3) Finally, hit the Export button. That’s all, your settings and content are saved.
Import Settings
Importing settings can be done almost like when exporting settings with just a few differences. This option gives you the ability to move a form to another page, where you can modify it or to another website. It is a time saver option.
Importing on the same website:
1) Move your mouse over the Module Settings button and then click on Import Content. A pop-up window will open.

2) Select the Root folder where the .XML file with your settings/content was saved.

3) Next, hit the Import button. After this, you will have a new form with the exact settings saved before.
Importing on another website:
Before applying the saved settings to another website, you need to download the Action Form XML file to your computer and the upload it to the other location. You can download the XML file just by clicking on it, like in the image below.

After downloading the XML file, follow the steps below to upload it to another website.
1) Go to Admin -> File Manager and click on Upload button. You will be redirected to the upload page.

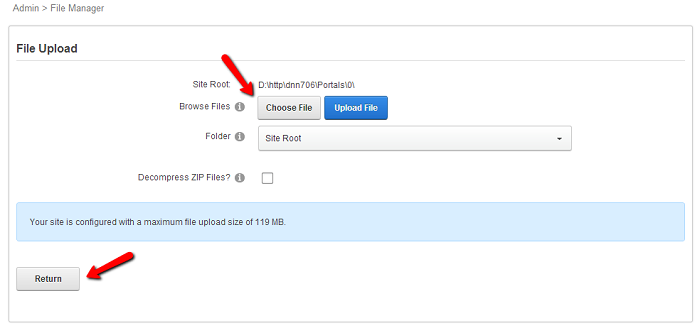
2) Click on Choose button -> Select the file you want to upload and click on Upload File button. After this click on Return button so that you go back to the File Manager section.

3) Now you will need to click on the Synchronize Files button so that the uploaded file to appear in the Import Content drop-down list.

4) Next follow the steps from the above section, Importing on the same website.