Creating New Templates
Creating a new Search Boost 4+ template is pretty simple, but it requires having basic knowledge about Razor, HTML, CSS and Javascript.
Step 1: Understanding how it works
In Search Boost 4 we have the Input Template and Output Template which can be modified individually and any Input(Search) will work with any Output (Result). The path where they can be found is the following: \DesktopModules\DnnSharp\SearchBoost\templates
The basic structure has 4 files: Template.json.config, template.cshtml, styles.css, script.js. While the first 2 are critical for a template to work, the last 2 are auxiliary(nice to have but not required).
Template.json.config - this file contains the template information, like:
- Id - unique id for the template
- DisplayName - name to appear in the settings drop-down
- CssIncludes - CSS Files to be added with with this templates to help in design
- JsIncludes - CSS Files to be added with with this templates to help in functionality
- TemplateFile - the razor template that will be rendered
Template.cshtml - The actual file that will be rendered. We will get there later in this document.
Step 2: Preparation
- Just copy the default folder from the Input or the Output folder and rename it.
- Open the new folder and edit the Template.json.config file
- Make sure that you update the values for Id and DisplayName. The rest can remain as they are for the moment.
You now have a clone of the default template that can be modified at any point. It’s also recommeded having a custom template because on module upgrade the default template gets overwritten.
Step 3: Modifying the template.cshtml file
This is the actual file where the layout and/or functionality can be changed.
Keep in mind to leave all @using lines and the error management part untouched. Making modifications there may cause unexpected behaviors.
All the settings inside Search Boost Studio are available here in different variables (eg: results , resultSet, behavior). Depending on what you want to change, all the sections inside the template have a comment that starts with two slash signs(//).
Let’s try to modify the //Panel section; the //Description (Output Template) to be exact. In the default template the line looks like this:
<p class="sb-description" style="clear:both">@Html.Raw(result.Description) </p>
Now let’s change the font size and the color of the text:
<p class="sb-description" style="clear:both; font-size:30px; color:red;">@Html.Raw(result.Description) </p>
If you don’t want to display this part at all, you can just delete it or hide it by adding the display:none; css attribute:
<p class="sb-description" style="clear:both; display:none;">@Html.Raw(result.Description) </p>
You can also edit the Description info or add your own custom html code:
<div class="sb-description" style="clear:both">
  <h3>Custom Title</h3>
  <p>@Html.Raw(result.Description) </p>
</div>
This can be done to any part of the template.cshtml to achieve your custom layout and/or custom logic.
The templates contain also <script> tags at the bottom of the files that control Sort, Filter, Pages. We don’t recommend changing this area, unless you fully understand the Search Boost Extension and the modifications are strictly necessary.
CSS Modifications can be added inline or in the style.css file, by targeting the desired element by its class. All HTML elements have individual classes that start with sb- and an unique class for each part(sb-head-
.sb-opt-456 sb-description {
font-size:30px;
color:red;
}
Creating XSL based templates
NOTICE: This type of template is considered obsolete in Search Boost 4+
The true customization power lies in the XSL based templates. They allow you to build any kind of layout you can imagine. To create your own templates we recommend that you become familiar with CSS, HTML and XSL.
The first thing you need to know before creating your own templates, is the structure of the XML used to transform the XSL template. Luckily, Search Boost allows you to stay in control while implementing the design by giving you view access to the underlying XML document.
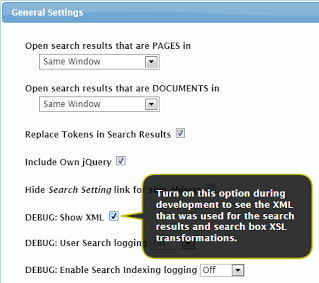
To view the underlying XML document,
- Go to Search Boost Administration Console by selecting the Manage > Search Settings options from the Search Input box in the Search Boost portal;
- Locate and click the General Settings link in the left pane. This will open the General Settings dialog box;
- Locate and select the DEBUG: Show XML option, identified on Figure 1;
- Save the dialog and return to the portal by clicking Back to Portal, located in the menu bar;
- Locate and click the DEBUG: Show XML link under the Input module displayed below.
- Important: Important: The link only appears in the Search Input box before a search. When the search is performed you will then see the link in the Search Results box.
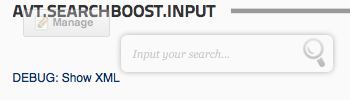
- Note that using the Debug Mode the XML link is visible to all users. This shows what the XML contains for different users. This means that you can use this function for debugging (especially for debugging results).
Search Input Templates
Search Boost reads the main.xsl file for the template you specified under the UI Settings tab and transforms it to following XML document displayed below:
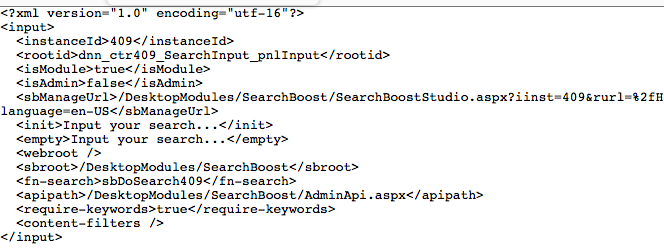
The following bullet list provides a definition for each XML tag specified in the screenshot:
- instanceId specifies the Module Id or Skin Object Control Id;
- rootId specifies the root id for the Search Input module;
- isModule is true or false depends if the instance is a module or a Skin Object;
- isAdmin is true of false depends if the current user is an administrator;
- sbManageURL specifies the URL for the Search Boost Administration Console;
- init specifies the Initial text for the Input search box. This could be empty text or user inputted text;
- b specifies the text for the empty search box;
- webroot specifies the root for the website. This is always empty except when the website runs in virtual directory;
- sbroot specifies the root element for
/DesktopModules/DnnSharp/SearchBoost; - fn-search specifies the name of the javascript that triggers the search;
- apipath specifies the URL for Search Boost Administration;
- requirekeywords is true or false depends if the instance require keywords;
- contentfilters may contain search filters. This is empty if no filters are specified.
Edit Search Input Template
To change the appearance of the Search Input Template:
- Click on Manage on the Search Input module;
- Then select Search Settings;
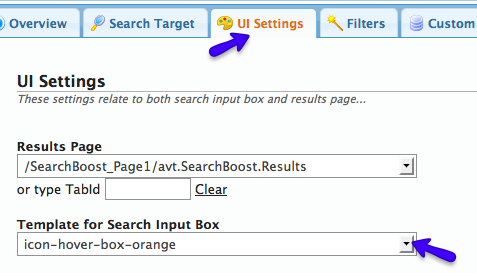
- In the Search Boost Control Panel, click the UI Settings Tab;
- Then click on the Template Search Input Box drop down box and select the template;
- Then Scroll down and click the Save UI Settings button.
Search Results Templates
Respectively, the XML used to transform the templates for search boxes look like the following XML code. You can view the XML after a search is performed by clicking on the DEBUG: Show XML below the search results.
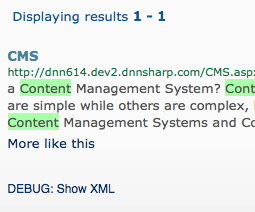
When you click on the DEBUG: Show XML link, a window with XML code appears. In code below, for example, the XML tags specifies details for the search term - “content”.
<?xml version="1.0" encoding="utf-8"?>
<search>
  <summary>
    <term>content</term>
    <resultcount>1</resultcount>
    <first_result>1</first_result>
    <last_result>1</last_result>
    <pagesize>10</pagesize>
    <pagecount>1</pagecount>
    <activepage>1</activepage>
    <locale>en-US</locale>
    <apipath>/DesktopModules/SearchBoost/AdminApi.aspx</apipath>
    <logid>41-9qzpc6sddtz3vqsy</logid>
    <social />
    <morelikethis>
      <baseurl>/SearchBoost_Page1.aspx?sb-search=content&sb-inst=409&sb-logid=41-9qzpc6sddtz3vqsy</baseurl>
    </morelikethis>
    <pages>
      <p ipage="1">/SearchBoost_Page1.aspx?sb-search=content&sb-inst=409&sb-logid=41-9qzpc6sddtz3vqsy&sb-page=1</p>
    </pages>
    <facets />
    <execution_time>0.16</execution_time>
  </summary>
  <results>
    <result>
      <author>4</author>
      <author_name />
      <description> a <span class='highlight'>Content</span> Management System? <span class='highlight'>Content</span> Management Systems implement features to store, manage and retrieve data efficiently. Some systems are simple while others are complex, but carry similar features. The three main CMS types are Web <span class='highlight'>Content</span> Management Systems, Enterprise <span class='highlight'>Content</span> Management Systems and Component <span class='highlight'>Content</span> Management Systems. ...</description>
      <module_id>413</module_id>
      <portal_id>0</portal_id>
      <pubdate>7/29/2012</pubdate>
      <relevance>1000</relevance>
      <docid>0</docid>
      <orderindex>1</orderindex>
      <type>mod</type>
      <subtype>DNN_HTML</subtype>
      <target>_self</target>
      <tab_id>83</tab_id>
      <tab_name>CMS</tab_name>
      <tab_title>Content Management Systems</tab_title>
      <mod_title>CMS</mod_title>
      <title>CMS</title>
      <url>//dnn614.dev2.dnnsharp.com/CMS.aspx</url>
      <plainurl>//dnn614.dev2.dnnsharp.com/CMS.aspx</plainurl>
      <ukey>nCbXhUouItH60eQInjLdRPblObmUt+kyVrfuyMr2qMPSIgdbo7Rg1kEBdo1480os</ukey>
      <urlfwd>/DesktopModules/SearchBoost/UrlFwd.ashx?url=http%3a%2f%2fdnn614.dev2.dnnsharp.com%2fCMS.aspx&ukey=nCbXhUouItH60eQInjLdRPblObmUt%2bkyVrfuyMr2qMPSIgdbo7Rg1kEBdo1480os&logid=41-9qzpc6sddtz3vqsy</urlfwd>
      <data />
    </result>
  </results>
</search>
A definition for each XML tag in image are specified below:
-
search is the Root Node.
- summary is a node that contains meta data about the search.
- term specifies the terms that were searched.
- resultcount is the number of results returned by the search.
- first_result is the absolute index of the first result in the list.
- last_result is the absolute index of the last result in the list.
- pagesize tells how many results fit ona page (this is configured in UI Settings).
- pagecount calculates and determine the total number of pages for a given page size.
- activepage tells the index (starting from 1) of the current page.
- locale tells current location.
- apipath is the root of the website (this is always empty other than when the website runs in virtual directory).
- logid is the id used to identify that specific search instance.
- social
- morelikethis is a node that contains the base url for the search page.
- baseurl is the url for the search page.
- pages is a node that contains the page address of the search.
- execution_time measures the elapse time from when Search Boost starts the search until the XML. object is created. Note that it does not measure how much time it takes afterwards to transform the XML or the time other components on the page takes to complete their execution.
-
results is the node that contains the list of results (the node below repeats for each result).
- result is the root node containing search results information.
- author is the ID of the User that published the content.
- author_name is the name of the User that published the content.
- description is a summary of the search result.
- original_description is a summary of the search result that exist in the index, before any logic is applied (such as the highlighter or stripping it to a certain length). This field was added in 2.9.106
- module_id is the module the result came from.
- portal id is the ID of the portal containing the module where the content originated.
- pubdate is the date when the content was published.
- relevance is the relevance returned by the DNN Search Provider.
- docid
- orderindex
- type is the result type that can be page or document (when the result comes from a file).
- subtype is for modules. This is always portal for documents and this is the extension for the file (for example pdf, doc, etc.)
- target determines the browser window that the result should be opened in.
- tab_id is the id of the page containing the module.
- tab_name is the name of the page containing the module.
- tab_title is the title of the page containing the module.
- mod_title
- title is the title of the page.
- url is the URL of the page containing the module that generated the result.
- plainurl
- ukey
- urlfwd
- data
- occurrences specifies how many times the result has been found inside this specific module.
-
result is the next result.
Edit Search Results Template
To change the appearance of the Search Input Template:
- Click on Manage on the Search Input module.
- Then select Search Settings.
- In the Search Boost Control Panel, click the UI Settings Tab.
- Then click on the Template Search Results Box drop down box and select the template.
- There are actually two options for Search Results.
- Then Scroll down and click the Save UI Settings button.
Additional Notes
Here are some more tips & tricks that will help you:
-
It is best that you start from an existing template (copy/paste). Modifying an existing pre-built template will put you in the position to lose all your changes on the next upgrade.
-
Do not put spaces or other non-standard characters in the template name (we recommend only a to z and the minus sign). This is to meet the strictest requirements when it comes to forming URLs for template resources.
-
Take a look at how existing templates are built; an example is worth a thousand words.
-
Note how each template have a distinct root CSS class. Although we recommend this practice, it is not required if you will never have the two search boxes on the same page because they only collide at that point.